Contents
Here at Volocopter, we recently added a new language to our portfolio: Kotlin. To help developers understand this language, we created this short tutorial that explores the differences between it and others like Java, Python, or C#. We'll be exploring our technology stack further in future articles on our technology radar.
Please note: This post was written for those with experience in other programming languages in mind, and not software development novices.
Why Kotlin?
Programming languages are in constant development, and learnings from previous decades are leading to changes that affect existing languages and lead to the creation of new ones. Python and Java, created in the 1990s, are children of their times. That's when the internet began to have an impact. What's more, object-oriented programming, as established in the pre-c++ and Ada era, was at the core of those new languages. But development evidently didn't stop there, and requirements grew. With the rise of distributed computing and concurrent programming, new languages appearing in the early 2000s like c#, D, and scala brought in functional constructs from old languages like Common Lisp. Soon, purely functional languages like F# and Clojure appeared on the scene, educating more and more developers about new ways to approach problems. Growing knowledge in object-oriented/imperative and functional finally led to a minor explosion of languages right after 2010, with now-mainstream ones like Rust, Golang, Swift, and Kotlin being created.
Those languages often have specific things in common - simple means to combine object-oriented and functional paradigms; higher-order functions; immutability; better support for concurrency; additional ways to branch code; Result types to reduce the need for exceptions; better handling of null to minimize exceptions. And many more things that often try to make you write fewer lines of code that's easier to read.
JetBrains (the creator of IntelliJ) developed Kotlin in 2010-2011 because they liked scala but hated its slowness. They released version 1 in 2016, and one year later it got support for Android, Spring, and multiple other platforms. One thing that made it so successful early on was that it worked so well with Java Code. But, more importantly, that the developers of the language openly worked with platforms and frameworks. In addition, they extended Kotlins with features that would make it easier to provide even better support to the framework providers.
All of this made Kotlin one of the most beloved languages (Stack Overflow Developer Survey 2020 - but, it still didn't stand a chance against Rust for obvious reasons).
But what is it all about? Do I need IntelliJ to use it? And how does it look? Let's find out.
For this short tutorial, all you need is a POSIX shell (if on windows, use wsl2) and an editor of your choice (let's hope it's vim!).
Installation and interactive shell
First, we have to install Kotlin. Other than docker, the best way to have it installed is sdkman. Alternatively, install it via curl -s https://get.sdkman.io | bash. Once this is done, install Kotlin via sdk install kotlin. Then, verify your application by running kotlinc and follow the code that is given:
❯ kotlinc
Welcome to Kotlin version 1.6.10 (JRE 13.0.7+5-Ubuntu-0ubuntu120.04)
Type :help for help, :quit for quit
>>> println("Hello world")
Hello world
>>> :quit
What you just did was use the interactive shell that Kotlin provides. You can start it at any time to execute statements, and they will run as long as they are valid Kotlin. For now, this is all we will need to get started. In the following exercises, we will be putting our code into files.
Variables
First, let's take a look at one of the cores of the language - assigning variables. There are two ways to define these: the val and the var keyword.
Let's see the difference in the interactive shell. First, open it again via kotlinc, and run the following two statements:
val firstText = "Hello World"
firstText = "Shut up, World!"
println(firstText)
var secondText = "Hello World"
secondText = "Shut up, World"
println(secondText )
The statement in line 2 will fail with:
error: val cannot be reassigned
firstText = "Shut up, World!"
^
For the secondText, the assignment was passed. That's because val defines a read-only, mutable variable, whereas var defines mutable variables.
In Kotlin, immutability is generally preferred over mutability. That means that you should try to create a val over a var.
Objects
With those declarations, you can also specify properties on Objects. For example, a property defined as val is a read-only property (the equivalent of a Java property with only a getter), whereas var is a mutable property.
Let's create an example in the interactive shell. Create a class like this:
class Drone {
    val name: String;
    var speed: Int = 0;
    constructor(name: String) {
        this.name = name;
    }
}
Now, let's take a look at what happens when we use the fields:
>>> val drone = Drone("drone 1")
>>> drone.name
res15: kotlin.String = drone 1
>>> drone.name = "Drone 1"
error: val cannot be reassigned
drone.name = "Drone 1"
^
As you can see, we cannot reassign the read-only field. So what happens for the var?
res17: kotlin.Int = 0
>>> drone.speed = 100
>>> drone.speed
res19: kotlin.Int = 100
We could reassign it, and setting it indeed changed the value. Getters and setters in Java allow additional functionality, which in Kotlin is similar to c#, using the set and get keywords.
class Drone {
    var speed: Int = 0
         get // default implementation
         set(value) {
              if (value in (1..50)) field = value
         }
}
If we instantiate this class and set the property, we will get the following results:
>>> val drone = Drone()
>>> drone.speed
res51: kotlin.Int = 0
>>> drone.speed = 20
>>> drone.speed
res53: kotlin.Int = 20
>>> drone.speed = 200
>>> drone.speed
res55: kotlin.Int = 20
Try to create some of your own use cases to get more familiar with getters and setters. You can also add annotations to getters and setters just as you would to functions.
Kotlin and null
When playing around with the value, you might have tried setting it to null. If you haven't, then we recommend you do. It will not work. That's because, by default, values in Kotlin are not nullable. This little treat means we are entering a world without NullpointerExceptions, one of the most substantial parts of Kotlin. Unlike in TypeScript, for example, the strong types in Kotlin will prevent any calls with null values, so unless a type is not explicitly specified as nullable, you can always expect a variable to be correctly set.
So, how can we specify a variable as nullable? All you have to do is add a question mark. And even with nullable variables, Kotlin will prevent you from running in a NullpointerException. Let's take a closer look:
>>> var hello: String? = "Hello World!"
>>> hello
res10: kotlin.String? = Hello World!
>>> hello.length
error: only safe (?.) or non-null asserted (!!.) calls are allowed on a nullable receiver of type String?
hello.length
     ^
As we can see, the compiler will complain as soon as we try to call something on a nullable entity. It's a friendly compiler, so it will even tell us what to do. We can either do a safe assertion (?.), which will only call the field/method if the parent is non-null, or we can use the "this is not null I swear" statement (!!.)
>>> hello?.length
res12: kotlin.Int? = 12
>>> hello = null
>>> hello?.length
res14: kotlin.Int? = null
Using the non-null assertion is generally something to avoid and will be applied primarily on tests. However, you shouldn't have to use it in your code because the Kotlin-Compiler tracks your checks, so if you have already verified the non-nullability of the field in the execution tree, you can access all fields without any further checks. Here's an example:
>>> val rememberMeNull : String? = "some text"
>>> /* code in between */
>>> if (rememberMeNull != null) {
... println("look, kotlin knows best!")
... println("Generic sum: ${5 + rememberMeNull.length}")
... }
look, kotlin knows best!
Generic sum: 14
>>>
As we can see, we don't have to write rememberMeNull?.length as we are already in a block in which the existence of rememberMeNull has been confirmed.
On top of that, the safe null call has a few traits that make working with null statements much more manageable. For instance, it allows chaining, and it even works on assignments. Thus, a statement like drone?.movement?.direction = remoteControl.getDirection() will only call the function getDirection if both drone and movement are not null.
Finally, the Elvis-Operator ?: will provide an alternative if the value is null. This way, we can extend our previous example like this:
>>> hello = null
>>> hello?.length
res14: kotlin.Int? = null
>>> hello?.length ?: 0
res15: kotlin.Int? = 0
Modules and imports
Now that we got into the basics of Kotlin, we learned how to use the interactive shell, how to assign variables and properties, and that we don't need to care about null.
Next, we will make your Kotlin code a little more durable by putting it into files. If you want to continue playing around with the interactive shell, feel free to do so.
To make this slightly more accessible, we will create a script helper to allow us to work with multiple files efficiently.
Create an executable file with the command touch kt && chmod +x kt and paste in the following:
#!/bin/bash

# change to the directory that contains the files you want to compile
cd $1
# remove the first argument so we can pass the rest later
shift

# get all kotlin files in the folder
files="$(find . -name '*.kt' -print)"

# compile to a jar
kotlinc $files -include-runtime -d out.jar
# run the jar, and pass the remaining arguments to it
java -jar out.jar "$@"
We will use the ./kt $DIRECTORY $ARGUMENTS command to compile all Kotlin files in a directory into a jar and run it with the designated arguments.
Let's try it. Create a directory and two files, like so:
mkdir hello-world
touch hello-world/app.kt
touch hello-world/greeter.kt
Open the files in your editor, and insert the following:
// greeter.kt
package com.volocopter.greeter

fun greet(who: Array<String>) =
    println(listOf("Hello", *who))

fun chatBot(): Nothing =
    TODO("That's out of scope for this tutorial!")

// app.kt
import com.volocopter.greeter.greet

fun main(args: Array<String>) =
    greet(args)
There are quite a few things that we accomplished with very little code. First, we created our first package, com.volocopter.printer, in printer.kt, and imported it into the app.kt. Note that we don't have to create classes for everything, unlike in Java. We also made our first functions; in Kotlin, these are defined with the keyword fun, expressing the intent behind the activity!
We also have a unique statement in Kotlin for the chatbot - TODO. This is a shorthand function for "throw new NotImplementedException" in Java, and as you can see, a function only throwing an exception returns Nothing. So this is a unique result type that Kotlin has created to handle this case. Kotlin does not have checked exceptions, as you might know them from Java, so this is the only time you can see that an exception is thrown from the method's signature.
The application is a simple *hello world" and will say "Hello $ARGS" to the caller. Let's use our script to run it and analyze it afterward.
❯ ./kt hello-world you
[Hello, you]
❯ ./kt hello-world world universe and beyond
[Hello, world, universe, and, beyond]
Arrays, lists, sets, and maps
As we can see, the script works as expected. In our greet function we take the arguments we received and print them. In addition, we create our first collection with the listOf function. This statement will create an immutable list of the type of arguments we provided. In our case, it will generate a list of strings. There are four basic collections provided in Kotlin: arrays, lists, sets, and maps. By default, all but the arrays are immutable. However, implementations for mutable collections are available for all of them. For instance, we can use the mutableListOf function to create a mutable list. As standard in Kotlin, you should always prioritize immutability over mutability. To extend a list with more elements, you can use the plus operator to combine two lists or the spread operator * to add an array.
Interlude: Why can't I use the spread operator on lists/sets/maps?
Kotlin uses JVM's runtime to execute the code, but "all" it does is translate it. For arrays, Kotlin works with JVM's varags. As with Java, you can declare arguments of functions as varargs, allowing you to pass a list of arguments to a function without explicitly creating an array. For instance, we can change our code to look like this:
fun message(who: Array<String>) =
    out("Hello", *who)

fun out(vararg what: String) =
    println(listOf(*what))
As you can see, we can pass both "Hello" and *who to the function out, which will become a String - Array. By *, you pass the array as an array, not as vararg. As varargs are always arrays, you cannot * a list - this might be confusing for Python developers used to a different behavior from the spread operator. We could (and should!) also have set up the main function with a vararg, by the way; for the sake of this detour, I decided against it.
Operator overloading, extension functions, & more
Coming back to lists: why would we want immutable lists over mutable ones? We want to retain control of when and how lists are changed. Otherwise, handling lists can lead to bugs and unexpected behavior, especially in concurrent contexts. For example, suppose we want to add elements to a list. In that case, we can easily create a new list with the added element using the + function, like so: val newList = oldList + "Hello" - The new list will now contain all elements from the old list, with "Hello" as the last element.
The + is internally implemented in Kotlin via operator overloading, and together with extension functions we can shape the list ever more to our liking. For example, say we want to uppercase the first character of every word and, in addition, create a "log" method that joins the String more nicely. Also, the message should not care about the details of combining the string and the array.
With the following code, we can do this:
infix fun String.to(who: Array<String>): List<String> =
    listOf(this, *who)

operator fun List<String>.not(): List<String> =
    this.map { it.replaceFirstChar(Char::titlecase) }

fun List<String>.log() : Unit =
    println(this.joinToString(" "))

fun message(who: Array<String>) =
    (!("hello" to who)).log()
Now the not operator may not be the most readable/understandable way to solve this problem, but I hope you get the gist. Without creating a new list implementation, we could extend its functionality. As expected, we get Hello World as the output when we run this with ./kt hello-world world.
The first function we have added is an infix function - This denotes a function whose name we can put in between the arguments, similar to the operators. The infix extension function infix fun String.to thus becomes a statement that allows us to combine a string with an array, returning a list. As you can see from reading the code "hello" to who this allows you to create a very readable DSL-like code, but be aware of the hidden complexity; for example, the conversation from String to List< String>, can be hard to trace and understand.
Let, apply, run, also
Kotlin also has several extension functions that make working with everything much more manageable. Remember, for instance, the null-safe operator we had earlier. For example, we can run something with the "let" extension if the statement is not null.
data class Employee(
    var firstName: String? = null,
    val age: Int = 0)

val employees = listOf(
    Employee(),
        Employee("Matthias", 27)
)

employees.forEach { employee ->
    employee.name?.let {
        println(it)
    }
}
Now the printlng statement is only executed for the employees with a name that is not null. Kotlin has multiple extension methods useful in different contexts for all objects. You can see an overview and when to use which on the following image:
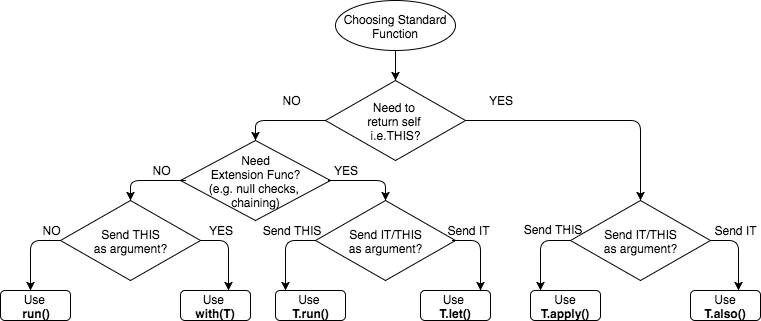
As an example, we can see that those statements are equivalent and lead to the same result:
fun languageSelf() {
    val languages = mutableListOf<String>()
    languages
            .apply {
                add("English")
                add("German")
                add("Spanish")
                add("Python")
            }
            .also { it.remove("Python") }
    println(languages)
}

fun language() {
    val languages = listOf<String>()
    val filteredLanguages =
            languages.let { it + "English" + "German" + "Spanish" + "Python" }
            .run {
                this - "Python"
            }
    println(filteredLanguages)
}
The main difference is that, in the first case, we operate on a mutable object, changing it, whereas the second creates new instances.
And if you followed this session, you can guess which one we prefer!
Now we'll take a quick look into a construct we have already used today: data classes, destructuring them, and then doing various actions with them.
Data classes
In one of the coding examples, we already used a construct that you may have found interesting. The code in question is the following:
import java.time.LocalDate

data class Employee(
        val firstName: String? = null,
        val lastName: String,
        val born: LocalDate,
)
A data class is a particular variant of an object designed to hold one of the most common traits in our applications: data.
Copying
With that in mind, Kotlin will derive certain members for a data class that behave very much like data types known from other languages. Therefore, the first function it provides is copy, a very convenient way to create copies of a data class.
fun main() {
    val person = Employee("Happy", "Fellow", LocalDate.of(1999, 9, 9))
    val partner = person.copy(firstName = "Sad", born = LocalDate.of(2001, 1, 1))
}
As you can see, we created a person and their partner. They are married, so we don't have to change the last name, only the first name - and the date of birth.
toString
It also comes with a toString implementation that allows us to pretty-print the data class without further ado. If we put the above code in a folder data-classes and extend the main function to
fun main() {
    val person = Employee("Happy", "Fellow", LocalDate.of(1999, 9, 9))
    val partner = person.copy(firstName = "Sad", born = LocalDate.of(2001, 1, 1))

    println("What does person look like? $person")
    println("What does partner look like? $partner")
}
we get the following result when running it with ./kt data-classes:
❯ ./kt data-classes
What does person look like? Employee(firstName=Happy, lastName=Fellow, born=1999-09-09)
What does partner look like? Employee(firstName=Sad, lastName=Fellow, born=2001-01-01)
Equality
We also get an equality check that compares a data class not by reference but by value. What does that mean? Let's take a look at some code and run it:
fun main() {
    val person = Employee("Happy", "Fellow", LocalDate.of(1999, 9, 9))
    val partner = person.copy(firstName = "Sad", born = LocalDate.of(2001, 1, 1))

    println("Person equals themselves? ${person.equals(person)}")
    println("Person equals their partner? ${person.equals(partner)}")
    println("Person equals their clone? ${person.equals(person.copy())}")
}
When executing ./kt data-classes again, we get the following results:
Person equals themselves? true- We expected that.Person equals their partner? false- We expected that too. For instance, the person and the partner are different and have another first name.Person equals their clone? true- This might be unexpected for some people. The equality check for value objects is on the values, not on the instance's reference.
Destructuring
And finally, data objects come with componentN functions. Those functions are not something you will use directly, but they allow you to destructure objects. Again, let's take our employee example. What we want to do next is print the employees on a lovely table in the shell.
import java.time.LocalDate
import java.time.Period

fun getAge(born: LocalDate) = Period.between(born, LocalDate.now())

fun main() {
    val person = Employee("Happy", "Fellow", LocalDate.of(1999, 9, 9))
    val partner = person.copy(firstName = "Sad", born = LocalDate.of(2001, 1, 1))
    val tableFormat = "| %-15s | %-15s | %-4s |"
    println(tableFormat.format("Last Name", "First Name", "Age"))
    println(tableFormat.format("-".repeat(15), "-".repeat(15), "-".repeat(4)))
    val employees = listOf(person, partner, Employee(null, "Doe", LocalDate.of(1981, 8, 8)))

    for ((firstName, lastName, born) in employees) {
        println(tableFormat.format(
            lastName,
            firstName ?: "",
            getAge(born).getYears())
        )
    }
The important line here is the start of the "for" loop. We don't need the employee object, only the specified fields; we can destructure the fields directly with the statement (firstName, lastName, born) in employees. This convention in Kotlin is also provided for a lot of internal structures. If you open the integrated shell, you can try out the following example with a map to get an idea:
>>> val theMap = mapOf("one" to 1, "two" to 2, "three" to 3, "four" to 4)
>>> theMap.forEach { (key, value) -> println("Key = $key, Value = $value") }
Key = one, Value = 1
Key = two, Value = 2
Key = three, Value = 3
Key = four, Value = 4
Note that the order of the fields is predefined. In our data class, firstName is always first, lastName second, and age third. If you want to exclude one or multiple items, you can name them _ to ignore them - for instance, (_, _, born) in employees will only return born.
Higher-order functions
We've already used another trait of Kotlin multiple times, but we haven't explained it yet: higher-order functions or short HOC.
We've already extensively used them for our let, apply, run and forEach statements. HOCs are functions that take in other functions as an argument. If we pass only one HOC as an argument, we don't have to provide it in the list of arguments in the () brackets, but we can give it as a body inside a { } block.
Let's refactor our example to make this more explicit. First, we will transform the getAge function into an HOC.
fun getAge(born: LocalDate) = Period.between(born, LocalDate.now())
fun getAge(born: () -> LocalDate) = Period.between(born(), LocalDate.now())
As you can see, the difference is subtle. The signature changes from LocalData to () -> LocalDate, and we have to call born when we want to use it in the Period.
The usage changes slightly, too:
getAge(born).getYears())
getAge { born }.getYears()
It might look as if we haven't gained much, but there is a significant difference. In the first example, we use a variable; the second offers us the complete flexibility of a function. For instance, we can apply transformations before returning the body, and as everything in Kotlin should be immutable, we can do this without any side effects to the outside scope. Also, we can compose HOCs to create very sophisticated logic explicitly. And depending on your preferences, it can improve the followability of the code. I, for one, sometimes struggle a bit to understand code from the outside in. One example is the println(tableFormat.format( line we had in our code. When I read the statement and the following lines, I will focus on understanding what the format function does, and I might forget about the println that prints the result. We can use the run extension HOC instead, allowing the reader to follow the executions on the entity in series:
// println(tableFormat.format(
//     lastName,
//     firstName ?: "",
//     getAge(born).getYears())
// )
tableFormat.format(
    lastName,
    firstName ?: "",
    getAge { born }.getYears()
).run(::println)
Another benefit this technique provides is that the lambda function has a well-defined boundary. An exemplary use of this is the use extension HOC, which implements a closable. In classic Java, you would use the try-with-resources, which looks like this:
private static void loadFile(String fileName) throws IOException {
    try (FileInputStream input = new FileInputStream(fileName)) {
     BufferedReader data = input.bufferedReader();
     return data.readText();
    }
}

// Later, in a function
String file = loadFile("data.txt")
In Kotlin, there is no need to put this into a function; as with the use HOC, you can run this as a statement returning the value in a single line. The code becomes:
val file = File("data.txt").bufferedReader().use({ it.readText() })Next, we will use our new knowledge of HOCs to create our first DSL, making our table printer much more reusable.
Domain-specific languages with Kotlin
We started by using HOFs (higher-order functions). Next, we'll use this technique to create a domain-specific language (DSL) in Kotlin for our table printer.
Our goal is to create a structure that we can reuse and extend easily, rather than having a specialized implementation. To do this, we will use the power of HOFs to create code that will look like this:
val employeeTable = table {
    header("Last Name", "First Name", "Age")
    row { person }
    row { partner }
    row { Employee(null, "Doe", LocalDate.of(1981, 8, 8)) }
}

employeeTable.buildAsString(::println)
To achieve this, we will combine the HOF with the builder pattern. We'll start by creating our Builder Class and a HOF to instantiate it:
class TableBuilder {
    fun buildAsString(printTo: (String) -> Unit): Unit =
        printTo("Not Implemented")
}
fun table(initializer: TableBuilder.() -> Unit): TableBuilder {
    return TableBuilder().apply(initializer)
}

val employeeTable = table { }
Here we combine several concepts that we have learned about already. The table HOF will create a new instance of the TableBuilder and use the apply extension HOF to modify its instance. We thus delegate the body of the initialiser function to the table builder and will have access to it in our method.
Let's extend it with a way to add a header to see how that works:
class TableBuilder {
    var header = listOf<String>()

    fun header(vararg row: String) {
        this.header = listOf(*row)
    }

    fun buildAsString(printTo: (String) -> Unit): Unit {
        printTo(header)
    }
}

fun table(initializer: TableBuilder.() -> Unit): TableBuilder {
    return TableBuilder().apply(initializer)
}

val employeeTable = table {
    header("Last Name", "First Name", "Age")
}
employeeTable.buildAsString(::println)
We've added the header function to the TableBuilder, so we can access it in the body of our function. Remember, apply passes this, and so we can use the members of the class just as if we were in it. We could also rewrite the code to make this more explicit by changing header("Last Name", "First Name", "Age") to this.header("Last Name", "First Name", "Age"), but this is not the Kotlin style as it reduces code readability.
Then, running this code the line employeeTable.buildAsString(::println) will output the result Last Name, First Name, Age.
We finish the table structure by adding a row HOF to add Employees as row entries, like this:
class TableBuilder {
    var header = listOf<String>()
    var rows = mutableListOf<List<String>>()

    fun header(vararg row: String) {
        this.header = listOf(*row)
    }

    fun row(employee: () -> Employee) {
        val (firstName, lastName, born) = employee()
        this.rows += listOf(firstName ?: "", lastName, getAge { born })
    }

    // ...
}
As an employee is a data class, we can destructure it and create a new row from its properties. Then, the only thing left to do is build a nicely formatted table string out of it. To do this, we will once more make heavy use of Kotlin's features to create concise code:
fun buildAsString(printTo: (String) -> Unit): Unit {
    val tableFormat = "| %-15s | %-15s | %-4s |%n"
    val table = listOf<List<String>>(
                    this.header,
                    listOf("-".repeat(15), "-".repeat(15), "-".repeat(4))
            ) + this.rows
    table.map { tableFormat.format(*(it.toTypedArray())) }
        .forEach({ printTo(it) })
}
We specify the format for our table, combine the header, some nice separator dashes, and the rows to the table, and finally map each row into a string by passing our list as an argument using the spread operator on the array representation of the list. Finally, we send each line to the printTo lambda as it comes in.
When bringing this together in our main, we do it like so:
fun main() {
    val person = Employee("Happy", "Fellow", LocalDate.of(1999, 9, 9))
    val partner = person.copy(firstName = "Sad", born = LocalDate.of(2001, 1, 1))

    table {
        header("Last Name", "First Name", "Age")
        row { person }
        row { partner }
        row { Employee(null, "Doe", LocalDate.of(1981, 8, 8)) }
    }.buildAsString(::print)
}
We get a nicely formatted table that looks like this:
| Last Name | First Name | Age |
| --------------- | --------------- | ---- |
| Happy | Fellow | 22 |
| Sad | Fellow | 21 |
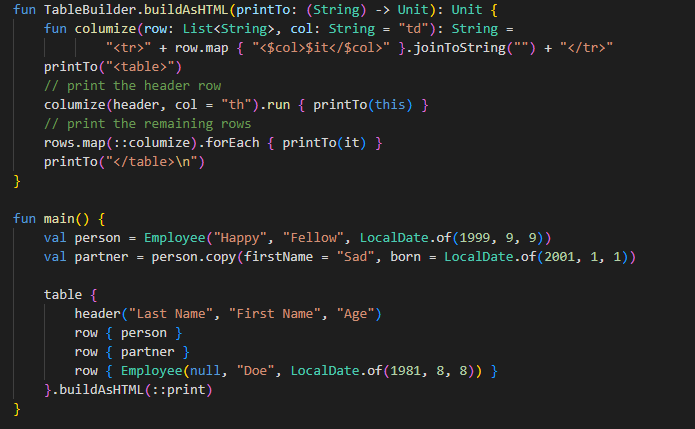
| | Doe | 40 |On top of that, we've also created a data structure that we can provide to others to use Kotlin's capabilities to extend it for their use case. For example, say someone wants to print this table as an HTML table. They'll have to add an extension method to the table before using it. In our example, that would lead to the following code:
fun TableBuilder.buildAsHTML(printTo: (String) -> Unit): Unit {
    fun columize(row: List<String>, col: String = "td"): String =
            "<tr>" + row.map { "<$col>$it</$col>" }.joinToString("") + "</tr>"
    printTo("<table>")
    // print the header row
    columize(header, col = "th").run { printTo(this) }
    // print the remaining rows
    rows.map(::columize).forEach { printTo(it) }
    printTo("</table>\n")
}

fun main() {
    val person = Employee("Happy", "Fellow", LocalDate.of(1999, 9, 9))
    val partner = person.copy(firstName = "Sad", born = LocalDate.of(2001, 1, 1))

    table {
        header("Last Name", "First Name", "Age")
        row { person }
        row { partner }
        row { Employee(null, "Doe", LocalDate.of(1981, 8, 8)) }
    }.buildAsHTML(::print)
}
Elements like that can be found in multiple libraries and are commonly applied across the entire Kotlin ecosystem. Understanding and using them is thus a promising approach for working with Kotlin.
Before we end this little starter session, we'd like to conclude with two more relevant things - generics and branching.
Generics
People coming to the JVM from other platforms like .NET are often thrown back on the limitations of generics, which are based on the fact that they suffer from type erasure. That means the application will only know the generic's information during compile-time and runtime, so the type is gone. For example, say you want to check if an element in a set is a number. Coming from c#, you'd try to do something like this:
fun <T> Comparable<*>.IsInstance() = this is T
fun main() {
    val set = setOf("1984", 2, 3, "Brave new world", 11)
    println(set.map { it.IsInstance<Int>() })
}
However, the compiler will complain with the following message:
main.kt:1:46: error: cannot check for instance of erased type: T
fun <T> Comparable<*>.IsInstance() = this is T
However, we can make this work by applying two crucial concepts - inlining and reifying.
First, it's essential to understand that HOFs can impose performance implications. As the JVM does not have native support, the Kotlin compiler will create an object for each of them, and the memory footprint and the virtual calls can add a runtime penalty. For typical problems, that will not impose an issue, but it can become noticeable in some scenarios. You can tell the Kotlin compiler to inline the HOF to mitigate this. The compiler will thus not create an object, but it will change the code so the function will be in the code. Remember: our getAge HOF. If we change it to an inline HOF like so: inline fun getAge(born: () -> LocalDate) = Period.between(born(), LocalDate.now()) the code using it will be transformed to
// val age = getAge { born }
val age = Period.between(born, LocalDate.now())
The HOF disappears, and we get no penalty. However, if we cannot expect performance improvements, Kotlin will notify us if we add inline to an HOF.
We can also add reifying to the mix for generic types when inlining a function. Reify is another piece of information for the compiler to resolve a specific part of the code to its more concrete implementation, generating concrete types for the generics that you can use just like regular classes. Thus, if we change our code to the following, type erasure is prevented and will work:
inline fun <reified T> Comparable<*>.IsInstance() = this is T
fun main() {
    val set = setOf("1984", 2, 3, "Brave new world", 11)
    println(set.map { it.IsInstance<Int>() })
}
Branching
Another thing that is common in languages is branching. A well-known exemple is the if statement. However, unlike in Java - and like almost everything in Kotlin - the if has a return value. So, you can write statements like:
    val response = getData("https://google.com")
    val result = if (response is Success) {
        response.data
    } else {
        response.error
    }
The result will thus get the output of the if statement. Kotlin also has another expression that allows even more powerful matching, the when.
With this little expression, we can change the above's code to
    val result = when (val response = getData("https://google.de")) {
        is Success -> response.data
        else -> response.error
    }
The when also supports more advanced matchers, like ranges, to make our branching logic much more readable. If we go back to our generics example and change it slightly to filter all elements of a type, we can create code like this:
inline fun <reified T> Iterable<*>.filterIsInstance() = filter { it is T }

fun main() {
    val set = setOf(8, "1984", 2, 3, 42, "Brave new world", 11)
    println(
        set.filterIsInstance<Int>().map {
            when (it) {
                in 1..2 -> "The number $it is between 1 and 2"
                in 3..10 -> "The number $it is between 3 and 10"
                42 -> "The number is the answer to everything!"
                else -> "oeh, didn't expect the number $it"
            }
        }
    )
}
We'd like to leave you with a little homework. And that is to recreate this code in a language of your choice and share it in the comments below.
As you can see, using the power that Kotlin provides and following the paradigms it has can lead to little code for a lot of complexity. Moreover, traits like null-safety and reified generics help with the typical pitfalls of the JVM landscape.
Those four articles were only a short introduction to the power that language provides. Other built-in constructs like Functional Interfaces, the Result Type, Type Aliases, coroutines, and callable bound references will dramatically enhance your code and help you get the most out of Kotlin.
I hope those articles also clarified that Kotlin is not just the "syntactic cherry" on top of Java, but a different language altogether, with other ideas on best practices and patterns. The fact that it can still make use of the Java ecosystem, and create code that Java can use, is merely a flourish of an excellent programming language.